-
Intro
Recently Let's Encrypt has announced that it will drop support for Expiration Notification Emails. When the announcement was made they even suggested a couple of services that provide this functionality, but where is the fun in that?
I decided that I will use a local service for that and since I use Home Assistant for a lot of other stuff, I decided that I will integrate this in my HA dashboard. Using HA also provides notifications out of the box, which I already use in my Home Assistant Companion App
Let the fun begin!
Finding the certificate information
I decided that it would be nice to have a small utility to give me the number of days until the certificate expire.
Fortunately it turns out that it is not that complicated to do it in Go. I've made a script to do that, you can find it here: https://github.com/claudiu-persoiu/domain-expire.
All the interesting logic it is:
1 conn, err := tls.Dial("tcp", domain+":443", conf) 2 .... 3 cert := conn.ConnectionState().PeerCertificates[0] 4 5 diff := cert.NotAfter.Sub(time.Now())We are just retrieving the chain of certificates, take the first one and subtract the time.
Feel free to download the appropriate executable for your OS from here: https://github.com/claudiu-persoiu/domain-expire/releases and rename it to
domain. I will be using that name for the executable for the rest of the tutorial.Home Assistant setup
To add it in Home Assistant we need to run the command above from time to time.
To make sure HA has access to the executable it should be copied to the
/configfolder, where the other HA configs are stored. Make sure it is moved and it can be run in that folder using the command line like so:$ ./domain google.comThe return value should be an integer representing the number of days before the certificate expires.
Now that we know it's working it's time to add the sensor to HA, edit
configuration.yamland add:1command_line: 2 - sensor: 3 unique_id: days_google_com 4 name: Days Google.com 5 command: "/config/domain google.com" 6 unit_of_measurement: "days" 7 scan_interval: 21600If you don't want to monitor Google, feel free to change that to your domain.
The scan interval is twice a day, I don't really need that to be any more often as this certificates don't change very often.
Restart HA. At this point the entity should be available in Home Assistant!
Home Assistant notification
Maybe you don't look that often at the HA dashboard, or don't look that often at this entity in particular and it doesn't really change that much over time, a notification would be very useful not to miss it!
I will be using the HA notifications as they are very convenient if you already use the Home Assistant Companion App.
In your
/config/automationsfolder create a new file, calleddomain.yamland add the code below:1- id: domain_alert 2 alias: Domain Google.com 3 trigger: 4 - trigger: time 5 at: "09:30:00" 6 conditions: "{{ states('sensor.days_google_com') | float < 10 }}" 7 action: 8 - data: 9 title: 'Update the certificate!' 10 message: 'Remember to update the certificate for Google.com!' 11 data: 12 sticky: 'true' 13 clickAction: "/lovelace/default_view" 14 service: notify.ALL_DEVICESAgain, if you don't work for Google you may need to change the
sensor.days_google_com.I've done some assumptions, the script will only run at 9:30AM, since the script doesn't change that often it doesn't make a lot of sense to do it very often, you may need to modify that.
Also the notification is send to all devices, if you have your spouse uses HA, maybe you don't want to do that, just keep that in mind.
Conclusion
In just a few easy (hopefully) steps you can now monitor your ssl certificates using your on HA instance, instead of using some other free service...
-
Intro
I recently bought a fireplace that's also heating water from some radiators. To achieve this it requires a recirculating pump.
The pump should start when the water is reaching a certain temperature and stops when the temperature is dropping under a threshold. Nothing very complex so far, the system used in fact a very basic thermostat and was working adequately:

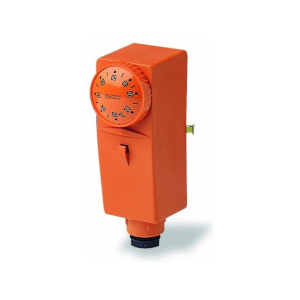
There were some shortcomings, like it wasn’t making very good contact with the heated pipe and had to start a bit early. This caused the stopping temperature to also be a bit late, so I wanted to be able to change those temperatures with ease.
Another requirement was for the device to be independent. If the device disconnects from the network for some reason, or Home Assistant is not working, it should start on its own, this is to prevent the water from boiling. Let’s just say I don’t want things blowing up just because they look cool. Also, it would be nice to stop on its own, so it doesn’t recirculate the water for no reason.
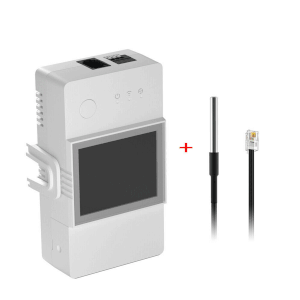
Sonoff TH Elite with a temperature probe seems to be the perfect tool for the job, and also has a very nice display to see the water temperature at a glance. Please note that, unfortunately for me, this wasn't sponsored.

Everything was perfect, except for one thing, I couldn't find a way to have a nice slider to control the temperature. I could hardcode it since it would probably never ever change, but what’s the fun in that?
And so my journey begins…
Get to coding
Device
I’m not going to spend any time talking about preparing the device, there are plenty of tutorials about flashing Tasmota. The code should work with any device running Tasmota, in fact the code for this tutorial has been written using just a generic Esp32 board I already owned and wasn’t actively using for anything else.
Berry script
If you got to this part, you probably didn’t burn your esp controller or your house. Congratulations, that was the hardest part!
All the magic comes from Berry Script, a scripting language that allows extending the functionalities of Tasmota.
Unfortunately, the documentation is not very clear and there's only one example at this point. There is a full example, but it is very complex and very hard to follow.
But let’s get to work. Firstly, we need to create the file that executes the script. To do that, connect to the device’s UI using the IP and go to
Tools>Manage File systemand click onCreate and Edit new file.Enter the file name on top with the name
autoexec.be, remove the file content and clickSave. From this point on we will be editing this file. When editing is involved, we will refer to this file.To make sure the file is getting compiled, from the
Main Menu, go toTools>Berry Scripting console.Enter
load('autoexec.be')and clickRun code (or press ‘Enter’ twice). You should see the outputtrue.
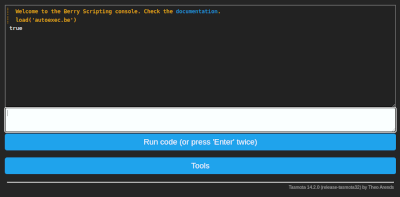
Setting the component
Edit
autoexec.beand enter the following code for a basic component:1import webserver 2 3class MySlider 4 def web_add_main_button() 5 webserver.content_send("<div style='padding:0'><h3>Set pump temperature</h3></div>") 6 end 7end 8 9 10d1 = MySlider() 11tasmota.add_driver(d1)Reload the UI again by using the
load('autoexec.be')command from above.Now, if we access the main page of the device we should see the text
Set pump temperature.
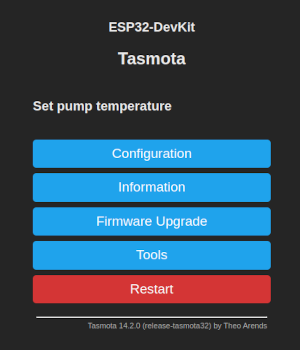
I guess the first secret is out, we just need to render some HTML to make this work.
We need one more thing, we need to save the value we set with the slider. Fortunately, that is very easy using the persist library. We can set the default value when the component it is loading:
1 def init() 2 if (!persist.m_start_temp) 3 persist.m_start_temp = 55 4 end 5 6 if (!persist.m_stop_temp) 7 persist.m_stop_temp = 50 8 end 9 endWe now have a default start temperature and a default stop temperature.
Since I need a start and a stop, I will make a method that renders either one or the other and send that to the output using
webserver.content_send, so the methodweb_add_main_button()will become:1 def web_add_main_button() 2 webserver.content_send("<div style='padding:0'><h3>Set pump temperature</h3></div>") 3 webserver.content_send( 4 self._render_button(persist.m_start_temp, "Start", "start") 5 ) 6 webserver.content_send( 7 self._render_button(persist.m_stop_temp, "Stop", "stop") 8 ) 9 endWe send the current value, the label for the slider and an id. The id will be later used to identify the element that has changed.
The rendering method is:
1 def _render_button(persist_item, label, id) 2 return "<div style='padding:0'>"+ 3 "<table style='width: 100%'>"+ 4 "<tr>"+ 5 "<td><label>"..label.." </label></td>"+ 6 "<td align=\"right\"><span id='lab_"..id.."'>"..persist_item.."</span>°C</td>"+ 7 "</tr>"+ 8 "</table>"+ 9 "<input type=\"range\" min=\"20\" max=\"70\" step=\"1\" "+ 10 "onchange='la(\"&m_"..id.."_temp=\"+this.value)' "+ 11 "oninput=\"document.getElementById('lab_"..id.."').innerHTML=this.value\" "+ 12 "value='"..persist_item.."'/>"+ 13 "</div>" 14 endoninputis used to change the value of the level on the screen. This is because the default html slider doesn't show the actual value that is selected and we will not know what was selected until the user stops, which would make for a bad UX.onchangeis to change the actual value, this is a bit of Tasmota magic.Now that we rendered everything, we need a way to save the updated value. This is done using the
web_sensormethod:1 def web_sensor() 2 3 if webserver.has_arg("m_start_temp") 4 var m_start_temp = int(webserver.arg("m_start_temp")) 5 persist.m_start_temp = m_start_temp 6 persist.save() 7 end 8 9 if webserver.has_arg("m_stop_temp") 10 var m_stop_temp = int(webserver.arg("m_stop_temp")) 11 persist.m_stop_temp = m_stop_temp 12 persist.save() 13 end 14 15 endAt this point, if we put everything together, it should do the job. There is however something that I want: we don't know the selected value in HA (if using it), so it would be nice to display it somewhere, just in case we forgot what was selected. To expose data we need to implement
json_append:1 def json_append() 2 var start = int(persist.m_start_temp) 3 var stop = int(persist.m_stop_temp) 4 var msg = string.format(",\"Pump\":{\"start\":%i,\"stop\":%i}", start, stop) 5 tasmota.response_append(msg) 6 endAt this point we completed the example! Let's see it:
1import webserver 2import persist 3import string 4 5class MySlider 6 7 def init() 8 if (!persist.m_start_temp) 9 persist.m_start_temp = 55 10 end 11 12 if (!persist.m_stop_temp) 13 persist.m_stop_temp = 50 14 end 15 16 end 17 18 def web_add_main_button() 19 webserver.content_send("<div style='padding:0'><h3>Set pump temperature</h3></div>") 20 webserver.content_send( 21 self._render_button(persist.m_start_temp, "Start", "start") 22 ) 23 webserver.content_send( 24 self._render_button(persist.m_stop_temp, "Stop", "stop") 25 ) 26 end 27 28 def _render_button(persist_item, label, id) 29 return "<div style='padding:0'>"+ 30 "<table style='width: 100%'>"+ 31 "<tr>"+ 32 "<td><label>"..label.." </label></td>"+ 33 "<td align=\"right\"><span id='lab_"..id.."'>"..persist_item.."</span>°C</td>"+ 34 "</tr>"+ 35 "</table>"+ 36 "<input type=\"range\" min=\"20\" max=\"70\" step=\"1\" "+ 37 "onchange='la(\"&m_"..id.."_temp=\"+this.value)' "+ 38 "oninput=\"document.getElementById('lab_"..id.."').innerHTML=this.value\" "+ 39 "value='"..persist_item.."'/>"+ 40 "</div>" 41 end 42 43 44 def web_sensor() 45 46 if webserver.has_arg("m_start_temp") 47 var m_start_temp = int(webserver.arg("m_start_temp")) 48 persist.m_start_temp = m_start_temp 49 persist.save() 50 end 51 52 if webserver.has_arg("m_stop_temp") 53 var m_stop_temp = int(webserver.arg("m_stop_temp")) 54 persist.m_stop_temp = m_stop_temp 55 persist.save() 56 end 57 58 end 59 60 def json_append() 61 var start = int(persist.m_start_temp) 62 var stop = int(persist.m_stop_temp) 63 var msg = string.format(",\"Pump\":{\"start\":%i,\"stop\":%i}", start, stop) 64 tasmota.response_append(msg) 65 end 66end 67 68slider = MySlider() 69tasmota.add_driver(slider)It's a fair bit of code, but it's hopefully not that hard to understand.
Setting the automation
Now that we have the data, we can set the actual automation. The rules are very simple:
- When the start temperature is reached, start the pump.
- When the temperature is below the set temperature, simply stop the pump.
1def heater_control(value) 2 3 if value >= persist.m_start_temp 4 tasmota.set_power(0, true) 5 end 6 7 if value < persist.m_stop_temp 8 tasmota.set_power(0, false) 9 end 10end 11# this is a specifc rule for Sonoff TH Elite temperature probe 12tasmota.add_rule("DS18B20#Temperature", heater_control)If you are using a different device, it may have a different name and the string
"DS18B20#Temperature"may need to be changed.The end result on the Sonoff TH Elite device should look like below:

Conclusion
Using some simple coding, you can make a not so interesting smart device into something you can brag to your friends about. The device values can now be easily set in a visual manner, and the value can be seen and used in Home Assistant.
-
Intro
Recently I've been faced with a strange endeavor. I received a Windows laptop. The strange part is that I was the only one in the entire technical department with a Windows laptop, everyone else had a MacBook. Of course the project was not made to work with Windows.
The only guys that had Windows before only had it for about a week (as a temporary workstation), but as days passed it became clear that my situation was not the same.
Considering this is 2021 and we have a full-blown chip shortage, I had to work with what was made available to me.
My first choice was to simply use Docker for Windows and Git for Windows, but that didn't prove to be a very good idea. The issue is that Windows apps want Windows line endings (\r\n) while Linux and macOS work with Unix like line endings (\n) and figuring out where to use one or the other proved to be a huge hassle. Even though I figured it out, I still could not commit all the files with the different terminator and I had to stash them before every pull.
How it's done
-
Download and install WSL2 using instructions from https://docs.microsoft.com/en-us/windows/wsl/install-win10
-
Restart Windows (because that's what Windows users routinely do)
-
From the "Microsoft Store" install a Linux distribution (in this tutorial I will use Ubuntu)
-
After the distro finishes installing, the setup will ask to create a username and password, so choose something appropriate, this will only be for the distro
-
Open a PowerShell with admin rights and run the following commands:
wsl --set-version Ubuntu 2 wsl --set-default Ubuntu
-
To check if the above steps ran successfully, run in the same shell:
wsl -l -vand you should see an entry with Ubuntu and version 2 -
Since you are ready to install Docker, follow the steps from https://docs.docker.com/engine/install/ubuntu/#install-using-the-repository
-
Now the work is almost done, the only remaining part is fixing the fact that the Docker service is not starting automatically;
-
Click on "Start" and search for "Task Scheduler";
-
Click on "Actions" > "Create Basic Task...";
-
Give it a name and click Next;
-
In the Trigger section select "When I log on" and click Next;
-
In the Action section select "Start a program" and click Next;
-
In the "Start a program" screen the value for "Program/script:" is "C:\Windows\System32\wsl.exe" and in "Add arguments (optional)" add "-u root service docker start" and click Next and then Finish;
This should be all, now (after a restart) the Docker daemon will start automatically.
I noticed that sometimes Windows doesn't execute the startup tasks if the laptop is not plugged in, if you are faced with this issue, or Docker just didn't start, run inside the distro:
service docker startJust a suggestion
If you are using the computer only for development, you should really consider switching to a user friendly Linux distro like Ubuntu. Tools like Docker and Git run a lot better on Linux and there is plenty of support for development tools like IntelliJ and VS Code. If you've never tried it before, you might be surprised at how user friendly it now is.
Using Docker on anything other then Linux is a compromise, even on a Mac, and especially on Apple Silicon hardware, which (for now) is even worse than Windows at this.
I've been using Ubuntu for my personal computer for many years and, with very few exceptions, I never needed anything else.
-
-
I've had this blog for more than 12 years.
In 2008, When I was starting this blog, Wordpress was the most popular open source blogging platform.
As time went by, many security flaws were discovered.
The plugins, the main driver for extending the platform and one of the main reasons why the platform was so popular, had many architectural concerns raised.
Today, after all this years, and with all this security and design consideration, Wordpress ended up being, well... probably the most popular PHP platform on the web, with all the legacy code still working with the new versions and many of the plugins from 2008 still going strong.
As time went by and I was writing less and less, it became obvious that I was spending more time keeping Wordpress up to date than actually using it to write.
So today I finally decided to move to Hugo.
Hugo is a static site generator, built in Golang. Everything is static when building with Hugo and, even more curious, there is no database, there are only config and Markdown files. So the end result for me is a lot less work on updating the platform.
With the new platform, a new theme also comes along, which brings the blog to a more modern look and with the very important feature of night mode!
Jekyll is the most popular platform for static site generator, but it is built with Ruby and I like Hugo better because the templates are generated from Go Template files. It is a matter of taste more than anything else.
And with this update, please enjoy my now static blog!
-
Something interesting happened to me recently: my access to a repository that required authentication was no longer valid. The problem in my case was a failure of the repository, but it could have just as easily been that I’ve lost my credentials or some other similar cause. My access was due to be restored soon. As we all know, soon in IT it can be anything from minutes to the end of life as we know it, and I needed to make a deployment before then.
And another thing, my local install was working.
For a while I wondered why my local was working, but, if you read the title, you already know why, my local cache was still valid.
I searched for a while for a way to get my local packages to the remove that was making the build, and there are ways, but I don’t want to waste days on an issue that may fix itself before I figure it out anyway.
The solution is very simple:
- make a copy of your local cache, if you are using linux it should be in “~/.composer”;
- put the copy on the server of your interest in a preferred location (let’s say /tmp/composer_cache);
- export the COMPOSER_CACHE_DIR variable (“export COMPOSER_CACHE_DIR=/tmp/composer_cache”);
- run composer as usual.
That’s it, you are now using your local cache on a remote server. It’s not the most elegant solution out there, but a quick and dirty hack that gets the job done easily.