-
Intro
I recently bought a fireplace that's also heating water from some radiators. To achieve this it requires a recirculating pump.
The pump should start when the water is reaching a certain temperature and stops when the temperature is dropping under a threshold. Nothing very complex so far, the system used in fact a very basic thermostat and was working adequately:
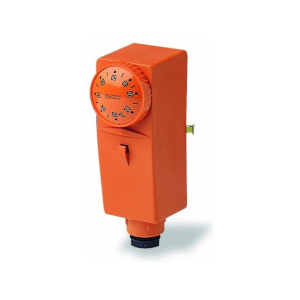
There were some shortcomings, like it wasn’t making very good contact with the heated pipe and had to start a bit early. This caused the stopping temperature to also be a bit late, so I wanted to be able to change those temperatures with ease.
Another requirement was for the device to be independent. If the device disconnects from the network for some reason, or Home Assistant is not working, it should start on its own, this is to prevent the water from boiling. Let’s just say I don’t want things blowing up just because they look cool. Also, it would be nice to stop on its own, so it doesn’t recirculate the water for no reason.
Sonoff TH Elite with a temperature probe seems to be the perfect tool for the job, and also has a very nice display to see the water temperature at a glance. Please note that, unfortunately for me, this wasn't sponsored.
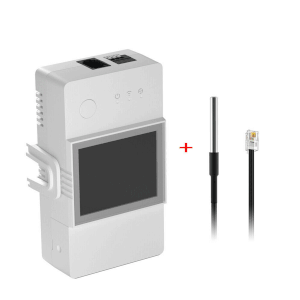
Everything was perfect, except for one thing, I couldn't find a way to have a nice slider to control the temperature. I could hardcode it since it would probably never ever change, but what’s the fun in that?
And so my journey begins…
Get to coding
Device
I’m not going to spend any time talking about preparing the device, there are plenty of tutorials about flashing Tasmota. The code should work with any device running Tasmota, in fact the code for this tutorial has been written using just a generic Esp32 board I already owned and wasn’t actively using for anything else.
Berry script
If you got to this part, you probably didn’t burn your esp controller or your house. Congratulations, that was the hardest part!
All the magic comes from Berry Script, a scripting language that allows extending the functionalities of Tasmota.
Unfortunately, the documentation is not very clear and there's only one example at this point. There is a full example, but it is very complex and very hard to follow.
But let’s get to work. Firstly, we need to create the file that executes the script. To do that, connect to the device’s UI using the IP and go to
Tools>Manage File systemand click onCreate and Edit new file.Enter the file name on top with the name
autoexec.be, remove the file content and clickSave. From this point on we will be editing this file. When editing is involved, we will refer to this file.To make sure the file is getting compiled, from the
Main Menu, go toTools>Berry Scripting console.Enter
load('autoexec.be')and clickRun code (or press ‘Enter’ twice). You should see the outputtrue.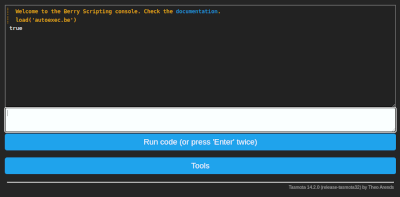
Setting the component
Edit
autoexec.beand enter the following code for a basic component:1import webserver 2 3class MySlider 4 def web_add_main_button() 5 webserver.content_send("<div style='padding:0'><h3>Set pump temperature</h3></div>") 6 end 7end 8 9 10d1 = MySlider() 11tasmota.add_driver(d1)Reload the UI again by using the
load('autoexec.be')command from above.Now, if we access the main page of the device we should see the text
Set pump temperature.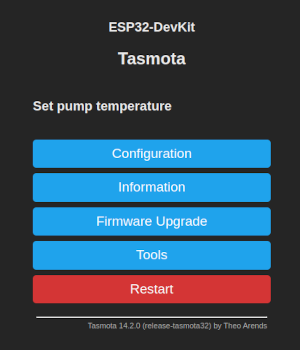
I guess the first secret is out, we just need to render some HTML to make this work.
We need one more thing, we need to save the value we set with the slider. Fortunately, that is very easy using the persist library. We can set the default value when the component it is loading:
1  def init()
2    if (!persist.m_start_temp)
3        persist.m_start_temp = 55
4    end
5
6    if (!persist.m_stop_temp)
7      persist.m_stop_temp = 50
8    end
9  end
We now have a default start temperature and a default stop temperature.
Since I need a start and a stop, I will make a method that renders either one or the other and send that to the output using
webserver.content_send, so the methodweb_add_main_button()will become:1 def web_add_main_button() 2 webserver.content_send("<div style='padding:0'><h3>Set pump temperature</h3></div>") 3 webserver.content_send( 4 self._render_button(persist.m_start_temp, "Start", "start") 5 ) 6 webserver.content_send( 7 self._render_button(persist.m_stop_temp, "Stop", "stop") 8 ) 9 endWe send the current value, the label for the slider and an id. The id will be later used to identify the element that has changed.
The rendering method is:
1 def _render_button(persist_item, label, id) 2 return "<div style='padding:0'>"+ 3 "<table style='width: 100%'>"+ 4 "<tr>"+ 5 "<td><label>"..label.." </label></td>"+ 6 "<td align=\"right\"><span id='lab_"..id.."'>"..persist_item.."</span>°C</td>"+ 7 "</tr>"+ 8 "</table>"+ 9 "<input type=\"range\" min=\"20\" max=\"70\" step=\"1\" "+ 10 "onchange='la(\"&m_"..id.."_temp=\"+this.value)' "+ 11 "oninput=\"document.getElementById('lab_"..id.."').innerHTML=this.value\" "+ 12 "value='"..persist_item.."'/>"+ 13 "</div>" 14 endoninputis used to change the value of the level on the screen. This is because the default html slider doesn't show the actual value that is selected and we will not know what was selected until the user stops, which would make for a bad UX.onchangeis to change the actual value, this is a bit of Tasmota magic.Now that we rendered everything, we need a way to save the updated value. This is done using the
web_sensormethod:1 def web_sensor() 2 3 if webserver.has_arg("m_start_temp") 4 var m_start_temp = int(webserver.arg("m_start_temp")) 5 persist.m_start_temp = m_start_temp 6 persist.save() 7 end 8 9 if webserver.has_arg("m_stop_temp") 10 var m_stop_temp = int(webserver.arg("m_stop_temp")) 11 persist.m_stop_temp = m_stop_temp 12 persist.save() 13 end 14 15 endAt this point, if we put everything together, it should do the job. There is however something that I want: we don't know the selected value in HA (if using it), so it would be nice to display it somewhere, just in case we forgot what was selected. To expose data we need to implement
json_append:1 def json_append() 2 var start = int(persist.m_start_temp) 3 var stop = int(persist.m_stop_temp) 4 var msg = string.format(",\"Pump\":{\"start\":%i,\"stop\":%i}", start, stop) 5 tasmota.response_append(msg) 6 endAt this point we completed the example! Let's see it:
 1import webserver
 2import persist
 3import string
 4
 5class MySlider
 6
 7  def init()
 8    if (!persist.m_start_temp)
 9        persist.m_start_temp = 55
10    end
11
12    if (!persist.m_stop_temp)
13      persist.m_stop_temp = 50
14    end
15
16  end
17
18  def web_add_main_button()
19    webserver.content_send("<div style='padding:0'><h3>Set pump temperature</h3></div>")
20    webserver.content_send(
21      self._render_button(persist.m_start_temp, "Start", "start")
22    )
23    webserver.content_send(
24      self._render_button(persist.m_stop_temp, "Stop", "stop")
25    )
26  end
27
28  def _render_button(persist_item, label, id)
29    return "<div style='padding:0'>"+
30        "<table style='width: 100%'>"+
31          "<tr>"+
32            "<td><label>"..label.." </label></td>"+
33            "<td align=\"right\"><span id='lab_"..id.."'>"..persist_item.."</span>°C</td>"+
34          "</tr>"+
35        "</table>"+
36        "<input type=\"range\" min=\"20\" max=\"70\" step=\"1\" "+
37          "onchange='la(\"&m_"..id.."_temp=\"+this.value)' "+
38          "oninput=\"document.getElementById('lab_"..id.."').innerHTML=this.value\" "+
39          "value='"..persist_item.."'/>"+
40      "</div>"
41  end
42
43
44  def web_sensor()
45
46    if webserver.has_arg("m_start_temp")
47      var m_start_temp = int(webserver.arg("m_start_temp"))
48      persist.m_start_temp = m_start_temp
49      persist.save()
50    end
51
52    if webserver.has_arg("m_stop_temp")
53      var m_stop_temp = int(webserver.arg("m_stop_temp"))
54      persist.m_stop_temp = m_stop_temp
55      persist.save()
56    end
57
58  end
59
60  def json_append()
61    var start = int(persist.m_start_temp)
62    var stop = int(persist.m_stop_temp)
63    var msg = string.format(",\"Pump\":{\"start\":%i,\"stop\":%i}", start, stop)
64    tasmota.response_append(msg)
65  end
66end
67
68slider = MySlider()
69tasmota.add_driver(slider)
It's a fair bit of code, but it's hopefully not that hard to understand.
Setting the automation
Now that we have the data, we can set the actual automation. The rules are very simple:
- When the start temperature is reached, start the pump.
- When the temperature is below the set temperature, simply stop the pump.
 1def heater_control(value)
 2
 3  if value >= persist.m_start_temp
 4	  tasmota.set_power(0, true)
 5  end
 6
 7  if value < persist.m_stop_temp
 8	  tasmota.set_power(0, false)
 9  end
10end
11# this is a specifc rule for Sonoff TH Elite temperature probe
12tasmota.add_rule("DS18B20#Temperature", heater_control)
If you are using a different device, it may have a different name and the string
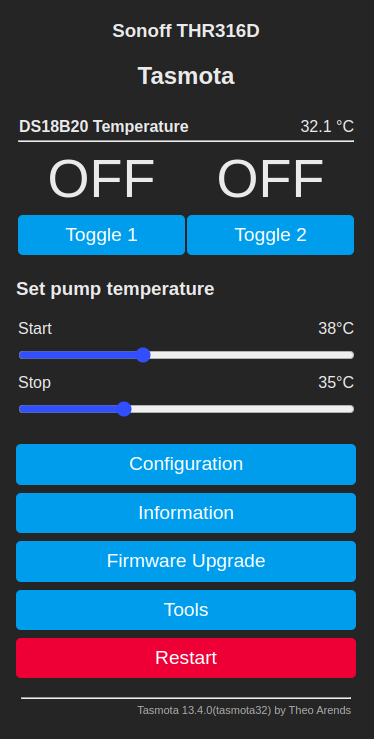
"DS18B20#Temperature"may need to be changed.The end result on the Sonoff TH Elite device should look like below:
Conclusion
Using some simple coding, you can make a not so interesting smart device into something you can brag to your friends about. The device values can now be easily set in a visual manner, and the value can be seen and used in Home Assistant.
-
How to make use of the Xiaomi Air Conditioning Companion in Home Assistant in only 20 easy steps!
Oct 13, 2019 homeassistant
Step 1:
Buy a Xiaomi Air Conditioning Companion without first researching how well it is supported by Home Assistant.
Step 2:
Realize that the Chinese power socket for 16A is different from the 10A one.
Step 3:
Realize that nobody is selling a 16A socket adapter for a 10A China power outlet in Romania.
Step 4:
Order a 16A power socket from China.
Step 5:
Wait 2 months for both the socket and the device to arrive from China.
Step 6:
Realize that there is no adapter for the wall outlet from China also.
Step 7:
Find the only seller that will sell a modular outlet that matches outlet box, probably by mistake
Step 8:
Wait for them to tell you that it will be delivered in a month
Step 9:
If it did not arrive yet, wait for a socket module to be delivered
Step 10:
Install the wall module and power socket
Step 11:
Connect the Xiaomi Air Conditioning Companion and AC for the first time
Step 12:
Realize that the Xiaomi Mi Home App has been updated in the meantime and there is no working tutorial on how to get the password for Home Assistant.
Step 13:
Figure out (after many tries) how to get the gateway password.
Step 14:
Add it to Home Assistant and realize that the gateway is not well supported and that the only things you can do from Home Assistant are sound the alarm and change its volume.
Step 15:
Find the xiaomi_airconditioningcompanion module and realize that you didn’t need the gateway password in the first place.
Step 16:
Downgrade the Xiaomi Mi Home App to get the token as specified in the instructions: https://www.home-assistant.io/integrations/vacuum.xiaomi_miio#retrieving-the-access-token
Step 17:
Realize that you don’t have the right version of Hass.io to use the module.
Step 18:
Move to Hassbian from Hass.io
Step 19:
Finally, install the extension and setup the module.
Step 20:
Now the only thing that remains is to enjoy the comfort of controlling your air conditioning from a few feet away, without ever using the remote!